
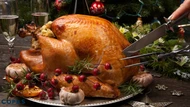
Carving a turkey at the table: a complete guide for stress-free serving
Posted by Copas Farm Shop on 19th Aug 2026
Carving a turkey at the table is straightforward when you rest the bird for at least 30–45 minutes after roasting, use a sharp long-bladed carving knife and a sturdy two-pronged fork, and work through the bird in a logical order — legs and thighs first, then wings, then the breast. The result is clean, generous slices that land on every plate still warm and full of flavour.
Key takeaways
- Rest the turkey for a minimum of 30 minutes (45 minutes for a large bird) before carving — this is the single most important step for juicy meat.
- You need two tools: a long carving knife (at least 25 cm blade) and a two-pronged carving fork.
- Always remove the legs and thighs before slicing the breast — attempting to slice the breast first leads to ragged, uneven cuts.
- Dark meat (legs and thighs) and white meat (breast) cook differently and carve differently — treat them as separate tasks.
- A turkey carved at the table takes around 10–15 minutes from first cut to last plate, assuming confident technique.
- A well-rested, slow-grown bird — such as a free-range turkey from Copas Farm Shop — will carve more cleanly than a fast-grown alternative, because the flesh is denser and holds its structure under the knife.
What equipment do you actually need to carve a turkey at the table?
You need a long, thin carving knife, a two-pronged carving fork, a large sturdy board, and a clean folded cloth or non-slip mat to anchor the board. That is the complete list.
The knife blade should be at least 25 cm long, ideally 30 cm, so a single draw of the blade produces one clean slice across the breast without sawing. A short knife forces you into a back-and-forth motion that tears the meat. Run the knife through a honing steel before you begin — even a blade that was sharp an hour ago benefits from a quick alignment.
The carving fork holds the bird steady so both your hands work in the same direction. Never use the fork to press or puncture deeply into the breast; it should grip the carcass or the leg, not the meat you are about to slice.
The board matters more than most people expect. A large wooden board — at least 40 cm × 50 cm — gives you room to work without losing slices over the edge. If carving at the table, place a folded damp cloth underneath to stop the board from sliding.
How long should you rest a turkey before carving?
Rest a turkey for at least 30 minutes, and up to 45–60 minutes for a large bird over 6 kg. Resting allows the muscle fibres to relax and the juices — driven to the centre by oven heat — to redistribute through the meat. Cut too early and those juices run out onto the board rather than staying in every slice.
Tent the bird loosely with foil during the rest. "Loosely" is important: a tight seal traps steam and softens the skin you worked hard to crisp. The foil slows heat loss without creating a steam chamber.
A 5–6 kg turkey will still be comfortably warm after a 45-minute rest in a warm kitchen. If your kitchen is cold or draughty, wrap the foil slightly more snugly and place the bird in a switched-off oven with the door ajar.
How to carve a turkey at the table: step by step
Work through the bird in this order: legs and thighs, then wings, then breast. This sequence matters because removing the legs first exposes the breast cleanly, making those long, even slices much easier.
-
Place the rested bird breast-side up on the board. Remove the foil and any trussing string. Position the bird so the legs point towards your dominant hand.
-
Remove the first leg and thigh. Hold the leg with the fork or grip it with a clean cloth. Pull the leg away from the body to locate the hip joint. Slice down through the skin between the leg and the breast, then press the leg outward until the hip joint pops. Cut through the joint — not through bone — and set the whole leg-thigh piece aside.
-
Separate the thigh from the drumstick. Place the leg flat on the board. Find the knee joint by pressing gently — it sits roughly where the thigh and drumstick meet. Slice cleanly through the joint. Slice the thigh meat off the bone in even pieces, or serve the drumstick whole.
-
Repeat on the other side. Mirror steps 2 and 3 for the second leg and thigh.
-
Remove the wings. Press each wing away from the body, locate the shoulder joint, and cut through it. Wings can be served whole or set aside for stock.
-
Slice the breast. Position the knife parallel to the breastbone and slice downward in long, smooth strokes, working outward from the centre. Each slice should be 5–8 mm thick — thin enough to be tender, thick enough to hold warmth on the plate. Work along one side completely before moving to the other.
-
Collect the juices. Tilt the board slightly and pour any pooled juices into your gravy — they are concentrated flavour. Nothing should go to waste.
-
Keep the carcass for stock. Once both sides are carved, the carcass still carries enough collagen and flavour for a rich turkey stock. Refrigerate or freeze it the same day.
What is the best way to carve the turkey breast for even slices?
Slice the breast parallel to the breastbone, not perpendicular to it. Many people instinctively try to carve straight down from the top of the breast, which produces awkward, triangular pieces. Instead, make your first cut along the length of the breastbone as a guiding edge, then slice outward in long, even strokes.
A single smooth draw of the knife — back to front, without pressing down — produces the cleanest slice. Pressing forces juice out and compresses the meat. Let the sharpness of the blade do the work.
Aim for slices of 5–8 mm. Thinner than 5 mm and the slices cool too quickly and tear easily; thicker than 10 mm and the texture can feel dense rather than tender.
Carving at the table vs. carving in the kitchen: which is better?
| Option | Best for | Advantage | Limitation |
|---|---|---|---|
| Carving at the table | Relaxed family meals, presentation | Theatrical, keeps the moment, juices stay with the bird | Requires confident technique; messy boards in view |
| Carving in the kitchen | Large gatherings, tight timing | More control, easier to plate neatly | Bird cools faster; loses the occasion |
| Partial kitchen prep, finishing at the table | Mixed groups, formal meals | Best of both — legs and wings removed privately, breast carved tableside | Requires a warm serving platter ready |
Carving at the table works best when at least one person is comfortable with the steps above and isn't simultaneously managing gravy, sides, and conversation. If it's genuinely your first time, there's no shame in removing the legs in the kitchen and carving only the breast tableside — that alone creates a good impression.
What are the most common mistakes when carving a turkey?
Carving too soon. The single most common error. A turkey carved straight from the oven loses most of its surface moisture onto the board. Rest it — always.
Using a short or blunt knife. A short blade means multiple saw strokes per slice. A blunt blade crushes rather than cuts. Both produce ragged, uneven meat. Hone the knife before the bird comes out of the oven, not after.
Trying to slice through bone. Joints are gaps, not obstacles. If you feel resistance, stop and reposition the knife to find the joint. Forcing the blade through bone damages the knife and produces bone splinters in the meat.
Carving the breast before the legs. With the legs still attached, the bird rocks and the breast is harder to access cleanly. Legs always come off first.
Pressing down with the fork into breast meat. The fork is for stability, not puncturing. Grip the carcass or use the fork at the side — don't push it into the slices you are about to serve.
Forgetting the oysters. On either side of the backbone, nestled in two small hollows, sit the oyster muscles — widely considered the most flavourful pieces on the bird. Turn the carcass over after carving the breast and scoop them out with a spoon. They're small and easy to miss, but worth remembering.
How do you keep carved turkey warm while serving?
Arrange slices on a warmed platter and cover loosely with foil. A platter heated in a low oven (about 60°C) for 10 minutes before carving gives the slices 10–15 minutes of warmth without cooking them further.
Ladling a little hot gravy over the arranged slices just before serving restores surface temperature and adds moisture to any edges that have dried slightly during carving. This is standard practice in professional kitchens and works just as well at home.
If you're serving a large group and carving will take longer than 10 minutes, start with the dark meat — legs and thighs — as it cools more slowly and is more forgiving. Slice the breast last, closest to the moment it reaches the table.
Does the quality of the turkey affect how it carves?
Yes — noticeably. A slow-grown, properly rested bird with dense muscle structure holds together under the knife far better than a fast-grown bird with high water content. Fast-grown birds often have soft, loose flesh that tears rather than slices, making it harder to produce clean, even pieces.
Importantly, Copas's experience with slow-grown, dry-aged birds shows this difference is consistent and meaningful at the carving board: firmer flesh produces slices that hold their shape on the plate rather than collapsing. Turkeys from us here at Copas Farm Shop are slow-grown and dry-aged specifically because that process improves both flavour and structure.
A dry-aged bird also has lower surface moisture, so the skin crisps better during roasting and stays crisp longer after carving — which matters when you're carving at the table with guests watching.
Frequently Asked Questions
How long should I rest a turkey before carving at the table? Rest a turkey for at least 30 minutes after it comes out of the oven, and up to 45–60 minutes for a bird over 6 kg. Tent it loosely with foil to slow heat loss without trapping steam. A well-rested bird carves cleanly and stays juicier on the plate.
What is the best knife for carving a turkey? A long, thin carving knife with a blade of at least 25 cm is best. The length allows a single, smooth draw across the full width of the breast without sawing. Sharpen or hone it before use — a blunt knife crushes the meat rather than cutting it cleanly.
Do I have to remove the legs before slicing the breast? Yes. Removing the legs and thighs first exposes the breast fully and stops the bird rocking while you slice. Attempting to carve the breast with the legs still attached makes the job significantly harder and produces less even results.
Can I carve the turkey in advance and reheat it? You can carve the turkey up to 2 hours in advance and keep slices warm covered on a warmed platter. If carving the day before, store slices in an airtight container with a little reserved cooking juice to prevent drying, and reheat covered in a low oven (160°C) until piping hot. Texture is slightly better when carved fresh.
What is the oyster on a turkey and where do I find it? The oyster is a small, round muscle on each side of the backbone, nestled in a hollow at the rear of the bird. Many people consider it the most flavourful piece of dark meat on the turkey. After carving the breast, turn the carcass over and scoop the oysters out with a spoon — there are two, one per side.
How do I stop the board slipping when carving at the table? Place a damp folded cloth or a non-slip mat underneath the board before you start. On a polished table, even a large board will move under pressure unless it's anchored. Some carving boards have rubber feet built in, but a damp cloth works just as well.
Is white meat or dark meat harder to carve? White meat — the breast — requires more care because the slices need to be even and the flesh is less forgiving of a blunt knife or heavy-handed technique. Dark meat — legs and thighs — is denser and easier to handle, though the thigh requires you to locate and cut around the bone. Practise finding the hip and knee joints before the bird arrives at the table.
What should I do with the carcass after carving? Refrigerate or freeze the carcass on the day. It makes an excellent stock: simmer it for 3–4 hours with onion, celery, carrot, a bay leaf, and peppercorns, then strain. The resulting stock freezes well and is the base of a genuinely good soup or gravy the following day.